Sections
Overview
Much of the work in Footprint and in your Warehouse can be performed on Mobile Devices, using the Footprint Mobile Client. This can greatly increase efficiency, and allows Warehouse staff a constant connection to all the important information in the system.
Here, we'll take a quick look at the basics of using Mobile Devices, and some quick tips on setting up Motorola devices.
Setting Up Mobile Devices

Wireless Fusion
Wireless Fusion allows Motorola Mobile Devices to connect to Wireless Networks, which is necessary for operation of Footprint on the device. Before connecting to an existing Wireless Network, a profile for the network will have to be set up in Fusion.
1. Open the Menu, open the Fusion Wireless Companion section, and select Wireless Launch. From here, select Find WLANs, which will display a list of all available Networks found by the device. Tap and hold down on the Network you'd like to create a profile for, and select Create Profile from the list.
2. You can change the Profile Name if you'd like to help better identify the Network. Then select the Security Mode of the Network you'll be connecting to, and the Authentication type if necessary.
3. The Fast Roaming options apply only when connecting to networks configured over a series of Cisco or Motorola Access Points, and typically should be left unchecked.
4. Depending on the Authentication Type being used, you may have to work through several Tunneled Authentication screens, otherwise you can simply select the Encryption type for the Network, and select whether you'll enter a pass-phrase or hexidecimal key for the Network, if necessary. Then enter the pass phrase.
5. Leaving each Address Type checked here will automatically obtain the addresses from the server, or you can manually enter each address. Finally, you can choose a balance between power saving and network performance, with Continuous Aware Mode providing best performance, and Max Power Save offering longer battery life.
6. Once you're finished, you will be taken to the list of Profiles, and will automatically be connected to the Network. When searching for a network to connect to, the MC 45/65 will begin with the first Profile on the list, so you may want to move the new profile to the top of the list by tapping and holding it, then choosing "Move Up". This menu is also where you can make changes to or delete the profile.
7. After you're connected to your network, click OK, and you will be able to see the connection, along with the signal strength.
Wireless Fusion also provides tools for checking and testing the Wireless connectivity of your device. These tools can help tremendously in troubleshooting any Wireless LAN connection you've set up for your mobile computer.
1. Open the Menu, open the Fusion Wireless Companion section, and select Wireless Status. From here, you can check the strength of the Wireless signal you're connected to, view IP information about your device, and view and save a complete log of all wireless activity that has taken place on the device.
2. From the Wireless Companion section, you also have access to Wireless Diagnostics tools. These allow you to perform an ongoing ICMP ping test that displays graphed statistics by double-tapping an item, run Route Trace tests displaying each hop a packet takes to reach the host, and obtain a list of all Access Points within range of the device.

DataWedge
DataWedge data capture software enables Motorola Mobile Devices to read barcodes, converting the information to keystrokes readable in any open application.
1. Start out by simply enabling DataWedge by opening the application, and tapping "Running" to start the DataWedge process. Once the Status reads "Ready", you can begin reading barcodes with the Mobile Device.
2. Though the default settings will normally be sufficient, there are many possible configurations to best meet your needs. Under the Basic Configuration options, you can set the Basic Format of the read, instructing DataWedge to send the information however you would like.
3. You can configure the barcode symbology on the Decoders screen, where you can enable the reading and set up any specific type of barcode in DataWedge.
4. The Reader Parameters is where you can set up some of the more basic functionality of the scanner, including the Aim Type, the Beam Width, and more.
5. The Feedback screen lets you set the volume of the scan feedback, from zero to three, even allowing the beep to be disabled entirely.
Footprint
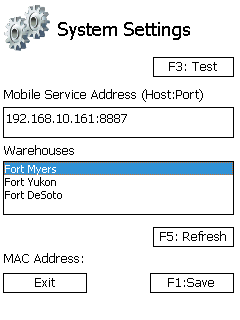
Once Footprint is installed on your Mobile Device (simply by running the .CAB file on the device), the program needs to be directed to the proper Server. This is done from the System Settings screen, accessed by tapping Settings or pressing the F3 button on the Login Screen.
1. Enter the Mobile Service Address the device will be connecting to. This consists of an IP Address, followed by a colon : and then the appropriate Port number.
2. Tapping Test or pressing F3 will ping the address to let you know whether the system is connecting or not.
3. Tapping Refresh or pressing F5 will refresh the list of Warehouses available at the provided address.
4. Tap Save or press the F1 key to save the changes made here and return to the Login screen. Otherwise, tap Exit to discard changes and return to the Login screen.
Using Mobile Devices
Opening Footprint
Just tap the Footprint desktop icon to open Footprint.

If the Footprint icon is not present on the Desktop, Footprint typically can be accessed through the Start menu, on the Programs screen.
Logging Into Footprint
The Login Screen allows the user to access the Client Application. This login information allows the application to track all the activities completed by the user. The user can also select from any database or Warehouse available.
1. Enter your Username. This is the same Active Directory account used to log into the Desktop client.
2. Enter your Password.
4. Select the Warehouse in which you will be working.
5. Tap the button.
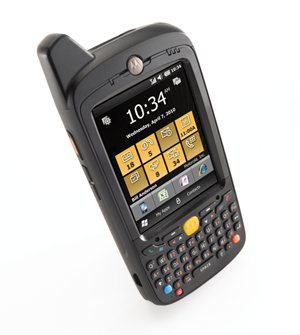
Motorola MC-65
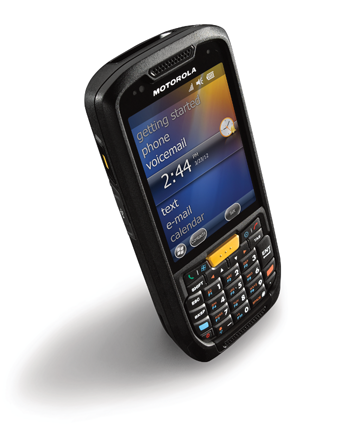
Motorola MC-45
Scanning
Scanning Barcodes into Footprint is simple - just tap the field the code needs to be entered into, and then scan the Barcode. Once the read registers, the code will be directly entered into the field.
Barcode Receiving requires additional information be set up in Footprint to decipher what is being scanned, and properly use that information for Materials, Quantities, Lots, and whatever other settings you'd like. This is done in the Barcode Definitions section.
Basic Scanning Tips
Though scanning Barcodes with a Mobile Device seems obvious and intuitive, here are a few tips to ensuring the best possible read:
- Try to hold the device about 10-14 inches away from the Barcode being scanned.
- Make sure the full Barcode is covered by the scanner - the Barcode reading line should span the entire code from beginning to end.
- When using a 2D Barcode scanner, point the target at the center of the Barcode.
- Holding the scanner at a slight angle rather than dead-on or perpendicular to the code decreases reflection, and may allow for an easier read.
- Make sure to give the scanner a moment to read the code - keep the button depressed until the Barcode registers.
| Last Updated: |
| 06/06/2025 |
Copyright © 2025 Datex Corporation